Don’t you just hate it when you sent a bunch of emails to a class or an individual student just to find out that the email when into spam. Why are emails sent from your organisation, to your students be marked as spam you ask? And how can we prevent it from happening in the future? Let’s take a look out how we can prevent emails going into the spam folder for good.
It all starts from the way you have setup your domain (eg www.myorganisation.edu.au) and exactly where you are sending your emails from. If you don’t setup your domain settings correctly or your emails are being sent from another server which is not from your domain, your important emails could end up in your students spam folder.
The basics
Watch the video below to get an overview of email authentication
Set up SPF, DKIM & DMARC for your organisation
Administrators should set up email authentication to protect their organisation’s email. Authentication helps prevent messages from your organisation from being marked as spam. It also prevents spammers from impersonating your domain or organisation by pretending to send the email from your domain and potentially redirect a student to a url which can cause harm to them and your organisation.
If spammers send forged messages using your organisation’s name or domain, people who get these messages might report them as spam. This means legitimate messages from your organisation might also be marked as spam. Over time, your organisation’s internet reputation can be negatively affected.
Help prevent spoofing and spam with SPF
Protect against spoofing & phishing, and help prevent messages from being marked as spam
Email servers use 3 email standards to help prevent spoofing and phishing of your organisation’s email. These standards also help ensure your outgoing messages aren’t marked as spam. We recommend administrators always set up these email standards for their email servers:
- SPF: Specifies the servers and domains that are authorised to send email on behalf of your organisation.
- DKIM: Adds a digital signature to every outgoing message, which lets receiving servers verify the message actually came from your organisation.
- Lets you tell receiving servers what to do with outgoing messages from your organisation that don’t pass SPF or DKIM.
SPF is a standard email authentication method. SPF helps protect your domain against spoofing, and helps prevent your outgoing messages from being marked as spam by receiving servers. SPF specifies the mail servers that are allowed to send email for your domain. Receiving mail servers use SPF to verify that incoming messages that appear to come from your domain were sent by servers authorised by you.
Without SPF, messages sent from your organisation or domain are more likely to be marked as spam by receiving mail servers.
Setting up SPF records
To setup SPF records let’s do the following
1. Check if you have SPF records already setup. Go to this website and enter your domain in the search box.

2. If you do not have SPF records, you will need to login to your domain host and add a TXT record. All edu.au domains are registered with domainname.edu.au so you should login here. If your domain is registered elsewhere, you will need to login there to add your SPF records. Some popular domain name registrars are GoDaddy and Crazy Domains. To search information on your domain to find out where it’s registered, search your domain in a WHOIS database.

If you use Google Workspace add the following TXT record for Gmail servers.
Please check out this page for specific SPF records for your setup type
If you are using Microsoft 365, you SPF record will look like this.
v=spf1 include:spf.protection.outlook.com -all
Please check out this page for specific SPF records for your setup type
If you are using another email service, please find out the SPF records specific to your service provider.
The other basic details needed for all SPF records are
- Record Type: TXT
- Hostname: @
- TTL:3600

When you add the SPF record at your domain, you’re done setting up SPF for your domain. It can take up to 48 hours for SPF authentication to start working. Next let's setup DKIM and DMARC authentication for your organisation
Next let's setup DKIM and DMARC authentication for your organisation
Setting up DKIM Records
We recommend you always set up a DKIM key for your domain, following the steps in this article.
Google Workspace
If you don't set up your own DKIM key, Gmail signs all outgoing messages with a default DKIM key: d=*.gappssmtp.com. Messages sent from non-Google servers aren't signed with the default DKIM key.
Step 1: Get your DKIM key in your Admin console
-
In your Google Admin console (at admin.google.com)…
- Click Authenticate email.
- In the Selected domain menu, select the domain where you want to set up DKIM.
- Click the Generate New Record button.
- In the Generate new record box, select your DKIM key settings
Setting Options DKIM key bit length 2048—If your domain provider supports 2048-bit keys, select this option. Longer keys are more secure than shorter keys. If you previously used a 1024-bit key, you can switch to a 2048-bit key if your domain provider supports them. Read more about domain keys and TXT record limits.
1024—If your domain host doesn’t support 2048-bit keys, select this option.
Prefix selector The default selector prefix is google. We recommend you use the default.
If your domain already uses a DKIM key with the prefix google, enter a different prefix in this field. Read more about DKIM selectors.
- At the bottom of the Generate new record box, click Generate. The text string beneath TXT record value changes to a new value.
- Copy the DKIM values shown in the Authenticate email window. You’ll add it at your domain provider in the next step:
DNS Host name (TXT record name)—This text is the name for the DKIM TXT record you’ll add to your domain provider’s DNS records. Enter this name in the Host field. TXT record value—This text is the DKIM key. You’ll add this to your DKIM TXT record. Enter the key in the TXT Value field.
Login to your domain provider for the next steps
Step 2: Add the TXT record name & DKIM key to your domain
Log into your domain provider and add the DKIM information you got in Step 1.
Keep these tips in mind:
- TXT record limits: Some domain providers limit TXT record length. If yours does, read TXT record limits and DKIM keys.
- DKIM can take up to 48 hours to start: After adding a DKIM key, it can take up to 48 hours for DKIM authentication to start working.
- Multiple domains: If you’re setting up DKIM for more than one domain, complete the steps below for each domain. You must get a unique DKIM key from the Admin console for each domain.
- Subdomains: If you need to set up DKIM for a subdomain, read Add a DKIM key for a subdomain.
For help with your domain sign-in information, settings, or TXT records, contact your domain provider. For example, if Google Domains is your domain provider, get help here. Google doesn’t provide technical support for third-party domain providers.
- Sign in to the management console for your domain provider.
- Locate the page where you update DNS settings for your domain.
- Add a TXT record for DKIM:
- In the first field, enter the DNS Host name (TXT record name) shown in the Admin console.
- In the second field, enter the TXT record value (DKIM key) shown in the Admin console.
- Save your changes.
Go back to your Admin console for the next step.
Step 3: Turn on DKIM signing
The Authenticate email page in your Google Admin console might continue to display this message for up to 48 hours: You must update the DNS records for this domain. If you've correctly added your DKIM key at your domain provider, you can ignore the message.
-
In your Google Admin console (at admin.google.com)…
- Click Authenticate email.
- In the Selected domain menu, select the domain where you want to turn on DKIM.
- Click the Start authentication button. When DKIM setup is complete and working correctly, the status at the top of the page changes to: Authenticating email.
Step 4: Verify DKIM authentication is on
- Send an email message to someone who is using Gmail or Google Workspace. (You can’t verify DKIM is on by sending yourself a test message.)
- Open the message in the recipient’s inbox and find the entire message header.
Note: Steps to view the message header differ for different email applications. To show message headers in Gmail, next to Reply, click More
Show original.
- In the message header, look for Authentication-Results. Receiving services use different formats for incoming message headers, however the DKIM results should say something like DKIM=pass or DKIM=OK.
If the message header doesn’t include a line about DKIM, messages sent from your domain aren’t signed with DKIM:
- Verify you completed all the steps in this article.
- Go to Troubleshoot DKIM issues.
Microsoft 365
If you don't set up DKIM for your custom domain, Microsoft 365 creates a private and public key pair, enables DKIM signing, and then configures the Microsoft 365 default policy for your custom domain.
Step 1: Enable DKIM signing for your custom domain through the Office 365 admin center
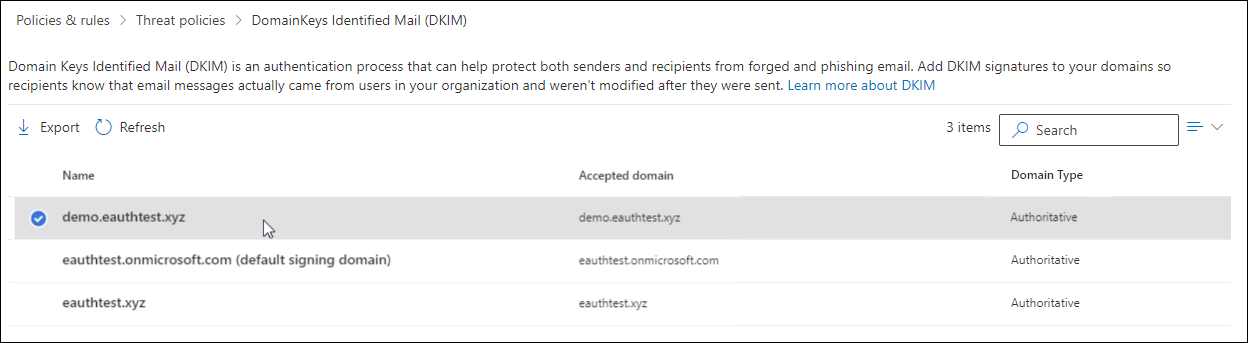
- Sign in to Office 365 with your work or school account.
- Select the app launcher icon in the upper-left and choose Admin.
- In the lower-left navigation, expand Admin and choose Exchange.
- Go to Protection > dkim.
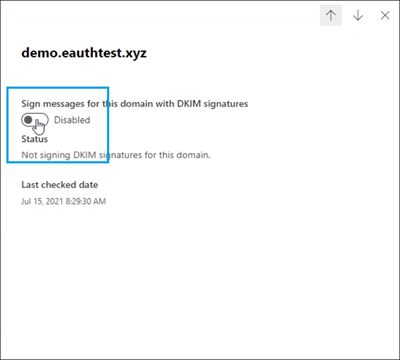
- Select the domain for which you want to enable DKIM and then, for Sign messages for this domain with DKIM signatures, choose Enable. Repeat this step for each custom domain.
- Slide the toggle to Enable. You will see a pop-up window stating that you need to add CNAME records.
Step 2: Add the CNAME record to your DNS service provider
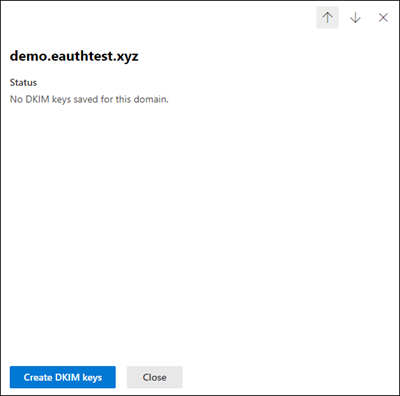
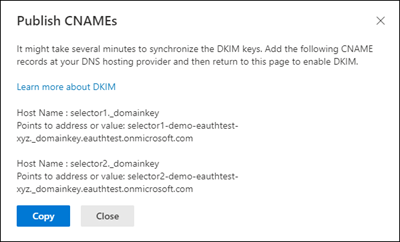
- Copy the CNAMES shown in the pop up window
-
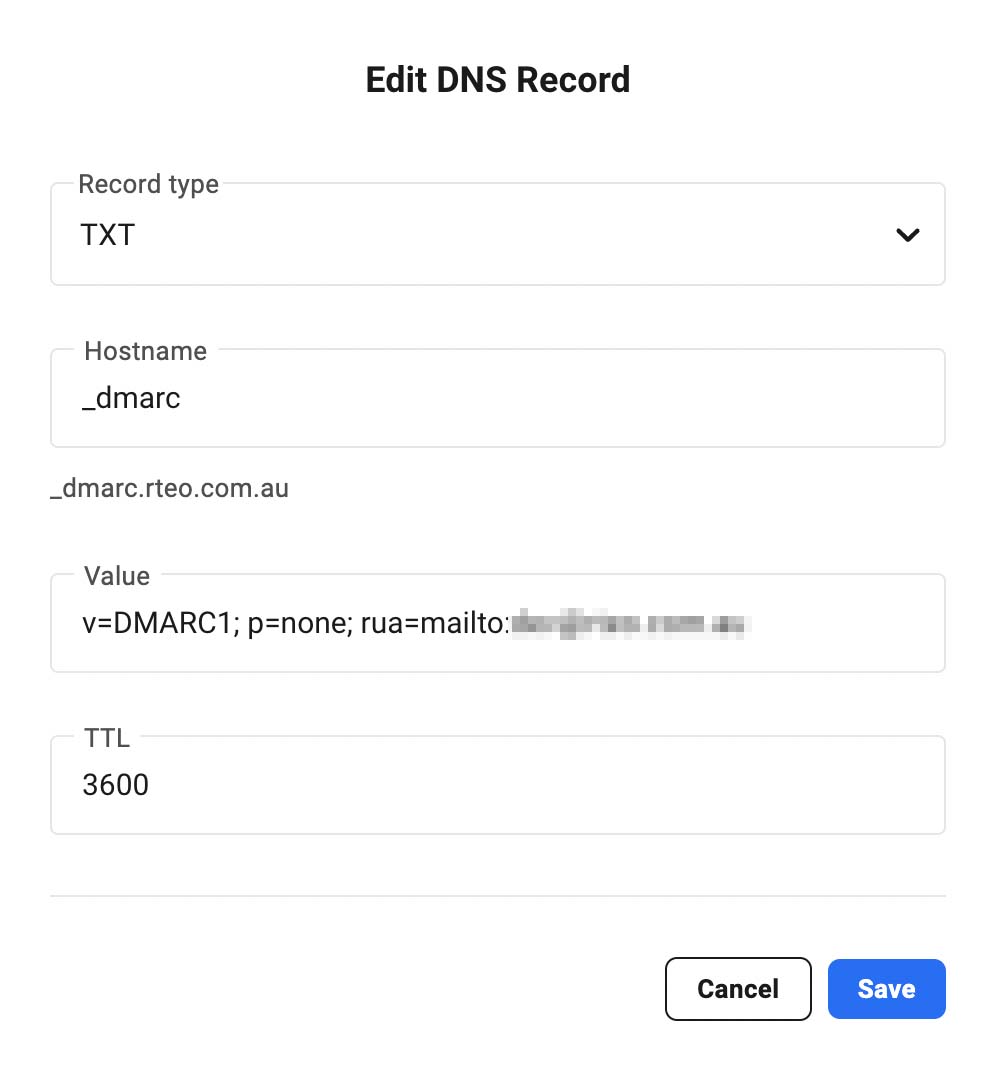
Publish the copied CNAME records to your DNS service provider.
On your DNS provider’s website, add CNAME records for DKIM that you want to enable. Make sure that the fields are set to the following values for each:
Record Type: CNAME (Alias)
• Host: Paste the values you copy from DKIM page.
• Points to address: Copy the value from DKIM page.
• TTL: 3600 (or your provider default)
Step 2: Enable DKIM
-
Return to DKIM page to enable DKIM.
If you see CNAME record doesn’t exist error, it might be due to:
- Synchronization with DNS server, which might take few seconds to hours, if the problem persists repeat the steps again
- Check for any copy paste errors, like additional space or tabs etc.
If you wish to disable DKIM, toggle back to disable mode
Setting up DMARC records
You define DMARC functionality by entering a DMARC record in your domain’s DNS settings.
After preparing the text of your DMARC record, add or update the DNS TXT record at your domain provider. To update a DNS TXT record, enter the line of text that defines your DMARC policy record in the management console for your domain provider.
Every time you change your DMARC policy and update your record, you must update the DNS TXT record at your domain provider
Check if you already have a DMARC record setup here
Add or update your record

Do these steps in the management console for your domain host, not in the Admin console
Configure DKIM and SPF before configuring DMARC. DKIM and SPF should be authenticating messages for at least 48 hours before turning on DMARC.
- Have the text file or line that represents your policy record ready.
- Sign in to the management console for your domain host.
- Locate the page where you update DNS records.
- Add a DNS TXT record, or modify an existing record, by entering your record in the TXT record for _dmarc:
- TXT record name: In the first field, under the DNS Host name, enter: _dmarc.YOURDOMAIN
Important: Some domain hosts automatically add the domain name after _dmarc. After you add the TXT record, you can verify the DMARC TXT record name to make sure it’s formatted correctly.
- TXT record value: In the second field, enter the text for your DMARC record, for example:
v=DMARC1; p=none; rua=mailto:dmarc-reports@YOURDOMAIN
The field names might be different for your provider. DNS TXT record field names can vary slightly from provider to provider. The domain used here is an example domain. Replace YOURDOMAIN with your own domain eg rteo.com.au
- TXT record name: In the first field, under the DNS Host name, enter: _dmarc.YOURDOMAIN
- Save your changes.
Verify the DMARC TXT record name (optional)
Some domain hosts automatically add your domain name to the end of the TXT record name, entered in step 4a of Add or update your record. This can cause the DMARC TXT record name to be incorrectly formatted.
For example, if you enter _dmarc.YOURDOMAIN and your domain host automatically adds your domain name, the TXT record name will be incorrectly formatted as _dmarc.YOURDOMAIN.YOURDOMAIN.
Outgoing Mail Settings for aXcelerate
If you keep the default settings in aXcelerate for outgoing mail settings, you will be using aXcelerate’s mail servers instead of your own custom mail server which is where the authentication settings for email have been applied.
To ensure your emails sent from aXcelerate send through your email servers, please follow this guide from aXcelerate’s support centre